High Quality Intercom circuit

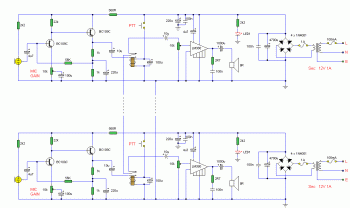
This is an intercom circuit which use LM380 as the audio amplifier and 2 transistors as the microphone pre amplifier. The sound quality will be good enough with low cost building.
electronic circuit diagram

This circuit consists of two identical intercom units. Each unit contains a power supply, microphone preamplifier, audio amplifier and a Push To Talk (PTT) relay circuit. Only 2 wires are required to connect the units together. Due to the low output impedance of the mic preamp, screened cable is not necessary and ordinary 2 core speaker cable, or bell wire may be used.

Detail explanation about this intercom circuit include the PCB layout, please visit this page
Stereo Tone Control circuit

Tags

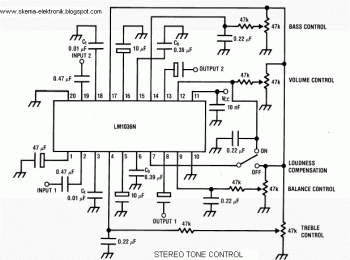
This is stereo tone control circuit based on IC LM1036. The circuit should be works with supply voltage 9V to 15V DC.


Stereo Tone Control circuit


And here the circuit's features:

  • Wide supply voltage range, 9V to 16V
  • Large volume control range, 75 dB typical
  • Tone control, ±15 dB typical
  • Channel separation, 75 dB typical
  • Low distortion, 0.06% typical for an input level of 0.3 Vrms
  • High signal to noise, 80 dB typical for an input level of 0.3 Vrms

Infrared Toggle Switch schematic diagram

Tags
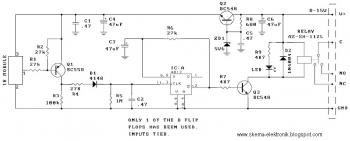
Use this Infrared toggle switch for wireless switching. You need to add IR receiver to electronic device for switching using this circuit.

Infrared Toggle Switch schematic diagram

COMPONENTS

R8________________ 680R
R7, R9____________ 4K7
R1, R2, R4, R6____ 27K
R3________________ 100K
R5________________ 1M
C1, C2, C5________ 470nF
C3, C4, C6________ 47u/16v ecap
IC________________ 4013
Q2, Q3____________ BC548
Q1________________ BC558
D1________________ 1N4148
D2________________ 1N4004
ZD1_______________ Zener diode 5V6
IR receiver module
LED
Miniature relay AZ-SH-112L

All modern IR remote control devices produce a continuous coded stream of pulses at 37.9 kHz when any button on the module is pressed. These IR pulses are detected and decoded by a receiver (your TV, VCR etc.) and the appropriate function activated. In our Kit the coded stream is converted into a single pulse and that single pulse is used to toggle a relay on & off. The coded information is lost. Only the fact that a button was pressed on your remote control unit is detected.

More about this Infrared Toggle Switch, download the manual

"Night Rider" 16 Stage Bi-Directional LED Sequencer circuit

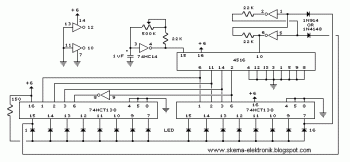
This bi-directional LED sequencer circuit uses IC CD4516 and IC 74HCT138 as counter and decoder.

16 Stage Bi-Directional LED Sequencer circuit diagram

Circuit explanation:
The bi-directional sequencer uses a 4 bit binary up/down counter (CD4516) and two "1 of 8 line decoders" (74HC138 or 74HCT138) to generate the popular "Night Rider" display. A Schmitt Trigger oscillator provides the clock signal for the counter and the rate can be adjusted with the 500K pot. Two additional Schmitt Trigger inverters are used as a SET/RESET latch to control the counting direction (up or down). Be sure to use the 74HC14 and not the 74HCT14, the 74HCT14 may not work due to the low TTL input trigger level. When the highest count is reached (1111) the low output at pin 7 sets the latch so that the UP/DOWN input to the counter goes low and causes the counter to begin decrementing. When the lowest count is reached (0000) the latch is reset (high) so that the counter will begin incrementing on the next rising clock edge. The three lowest counter bits (Q0, Q1, Q2) are connected to both decoders in parallel and the highest bit Q3 is used to select the appropriate decoder.

source: http://www.qsl.net/yo5ofh/hobby%20circuits/led_circuits.htm

18W amplifier circuit based on IC HA13118

Tags

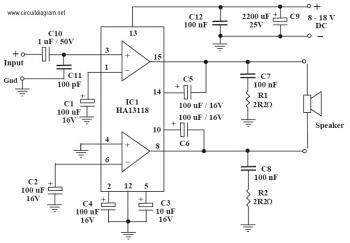
Here the 18W audio amplifier circuit which powered by IC HA13118 as the main component.The type of this amplifier is bridge amplifier since the output line does not grounded.

18W amplifier circuit based on IC HA13118


The supply voltage required for this circuit is 8 – 18V DC, at least 1 to 2 Amps. Maximum output power will only be obtained with a power supply of 18V at greater than 2 A, using a 4 ohm speaker. The power supply should be well filtered to reduce mains hum, a regulated supply will reduce noise even further. Extra filtering is unnecessary if operating from a battery supply.

View more explanation about this 18W audio amplifier circuit HERE.