Sine Wave Generator (1KHz Frequency)

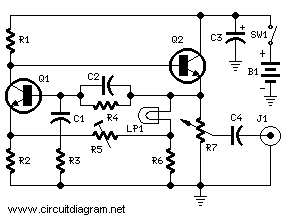
This is iKHz sine wave generator circuit built based on configuration of inverted Wien bridge (see C1-R3 & C2-R4). R5 and R7 used for output amplutide setting. Set R5 to read 1V RMS on an Audio Millivoltmeter connected to the output with R7 rotated fully clockwise, or to view a sinewave of 2.828V Peak-to-Peak amplitude on the oscilloscope.
Sine Wave Generator circuit diagram

Component list:
R1____________5K6  1/4W Resistor
R2____________1K8 1/4W Resistor
R3,R4________15K 1/4W Resistors
R5__________500R 1/2W Trimmer Cermet
R6__________330R 1/4W Resistor
R7__________470R Linear Potentiometer

C1,C2________10nF 63V Polyester Capacitors
C3__________100µF 25V Electrolytic Capacitor
C4__________470nF 63V Polyester Capacitor

Q1,Q2_______BC238 25V 100mA NPN Transistors
LP1___________12V 40mA Filament Lamp Bulb (See Notes)
J1__________Phono chassis Socket
SW1__________SPST Slider Switch
B1_____________9V PP3
Clip for 9V PP3 Battery

Notes:

  • The bulb must be a low current type (12V 40-50mA or 6V 50mA) in order to obtain good long term stability and low distortion.
  • Using a bulb differing from specifications may require a change of R6 value to 220 or 150 Ohms to ensure proper circuit's oscillation.
  • With C1, C2 = 100nF the frequency generated is 100Hz and with C1, C2 = 1nF frequency is 10KHz but R5 requires adjustment.
  • High gain transistors are preferred for better performance.
Audio Power Indicator

Tags
This is audio level indicator which can be used to measure the audio level output of your amplifier. Simply connect the output of your amplifier to the input of this circuit, then you will know the average value of your amplifier's power.
Audio Power Indicator circuit diagram

R1_____________220R  1/2W Resistor
R2,R5,R6,R8____100R 1/4W Resistors
R10,R12,R14____100R 1/4W Resistors
R3_____________220R 1/4W Resistor
R4,R7__________330R 1/2W Resistors
R9_____________560R 1/2W Resistor
R11____________820R 1/2W Resistor
R13______________1K2 1/2W Resistor

D1___________1N4004 400V 1A Diode
D2,D4,D6__BZX79C2V7 2.7V 500mW Zener Diodes
D3,D5,D7,D8,D9,D10 Red LEDs (Any dimension and shape) (See Notes)

Notes:

  • The output power indicated by each LED must be doubled when 4 Ohms loads are driven.
  • The circuit can be adapted to suit less powerful amplifiers by reducing the number of LEDs and related voltage dividers.
  • LEDs of any dimension can be used, but rectangular shaped devices will be more suitable to be compacted in bars or columns.
  • For a stereo amplifier, two identical circuits are required.

70 Watt MOSFET Audio Amplifier

Tags
electronic circuit diagram

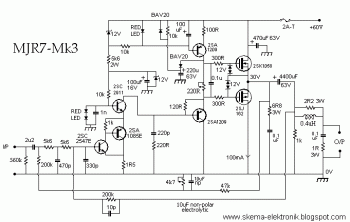
This amplifier circuit will give you about 70W output power at 60v supply.
Please visit this page for detail information and characterization

20W Bridge Audio Amplifier based on TDA2005

Tags
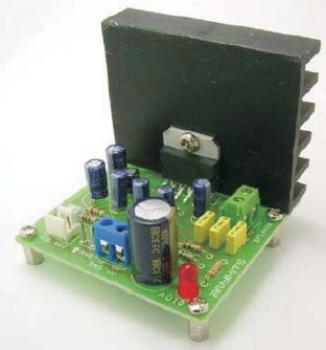
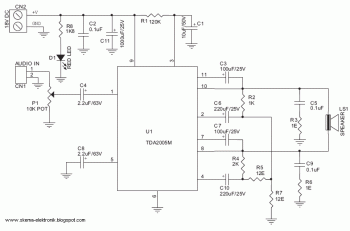
This is 20W Bridge Audio Amplifier circuit based on the TDA2005 IC, a class B dual audio amplifier, specifically designed for car radio applications etc.
This circuit require Voltage input 18 VDC and will give you Output power - 20 W, 4 Ω

This is the amplifier kit:
20W Bridge Audio Amplifier circuit diagram


This is the schematic:
20W Bridge Audio Amplifier circuit diagram


To get the schematic diagram, component list and component layout, please download this file

8 LED Audio Level Meter

Tags
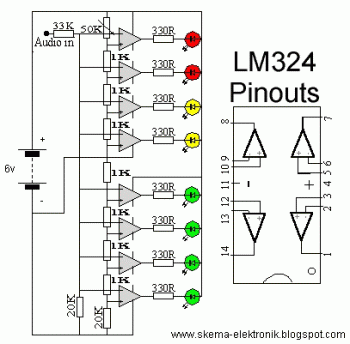
This is 8 LED audio level meter circuit diagram. Build based on 2 pieces of op-amp IC LM324. You should use 4 ICs for stereo audio level meter.
Here the schematic:
8 LED Audio Level Meter circuit diagram